

Hard Ops is a hard surface toolkit aimed to assist in making hard surface operations more efficient. There are many operations required to make hard surfaces and this plug in will lessen the amount needed making the process more enjoyable. In fact the creation of the sharpeners alone have turned a process into a step and that sort of ideology is the foundation behind Hard Ops.
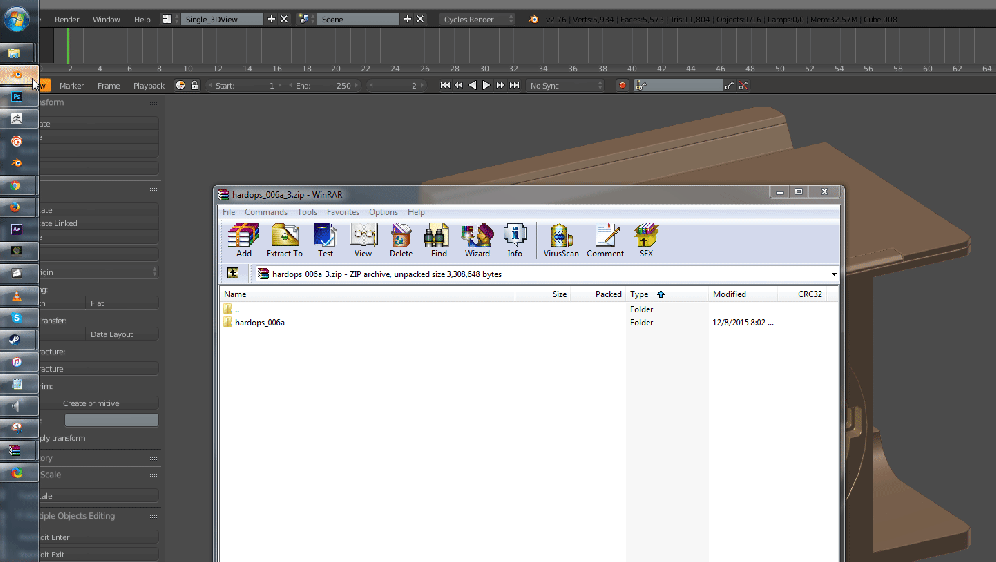
I have Blender from steam so I install add ons like this. Just put the whole folder in your add ons directory. It’s just easiest.
Personally I recommend installing it here:
C:\Users\”USER”\AppData\Roaming\Blender Foundation\Blender\2.76\scripts\addons\
Replace user with your user.
Hard Ops is currently a menu as well as a series of pie menus.
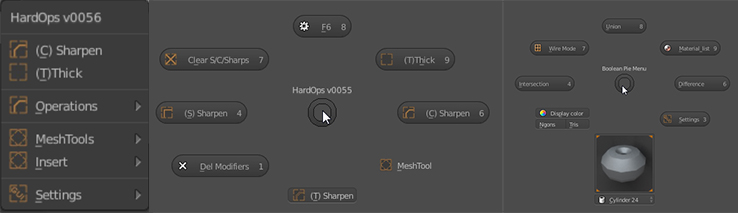
Credits to Wazou for his assistance on the add-on in general as well as pie menu support. I personally don’t use pies too much but people love em.
Q – brings up the Hard Ops Menu all of the options are here and is my personal way of operating hard ops.
Shift + Q – brings up the regular pie menu with sharpening options.
Ctrl + Shift + Q – brings up the Insert / Material / Boolean Pie.
These menus are still being adjusted and tested even as we speak so things are subject to change as workflows and tool improve and are being added. For this document I will be operating from the menu.
If you are using viewport pies or any other add-on that uses the Q key you will need to change the inputs via the input editor in order to use the menus correctly.
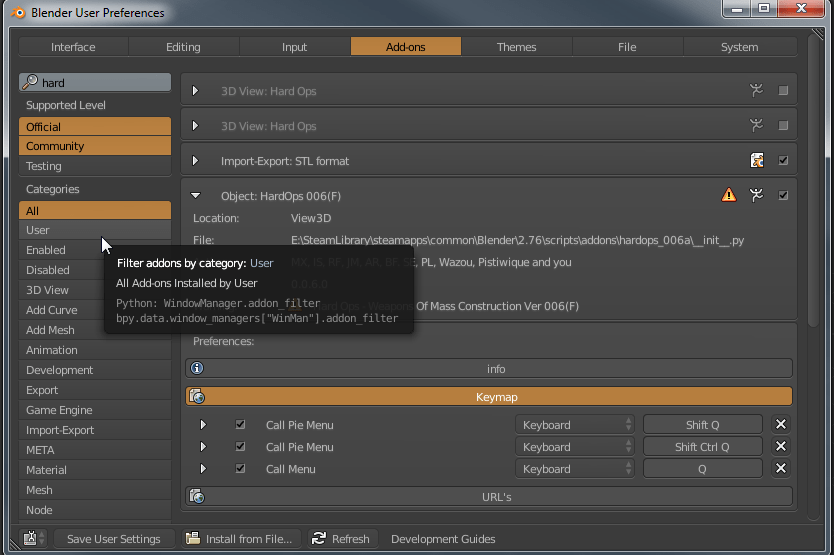
The latest version 006(F) now had an option to set the keymap. It is now removed. Its recommended to change it from the input editor but I prefer Q so that’s the default. If viewport pies come up when you press Q you have to remap something or disable viewport pies.
Now that key stuff is out of the way Let’s begin.
But enough about that. Lets get onto the add on and what it can do.
So to begin lets talk about ssharpen and it’s options.
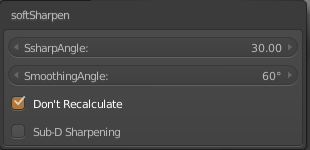
In short ssharpen is basically a sharpener without bevels.While this and csharpen may seem identical the ssharpener is more tailored to calculating sharps than csharpen so therefore is used more during edit mode level operations compared to csharpen.
The options here are mainly best left alone however the “Don’t Recalculate” is worth keeping in mind. This particular option will clear off the calculation of sharps and recalculate it. The process of leaving it checked will allow it to work in an additive mode as well as not clear the sharps that have been marked manually. More on that later.

At the beginning you see me hit smooth on this form and basically it makes it look pretty bad. The process of going into object data and enabling auto smoothing and setting the angle as well as manually marking sharp edges based off of sharpness was a tedious process and this was something that became clear while writing a book on hard surface. In order to more efficiently cover subject matter I wanted to make something that would ease that process.
So basically it’s a calculator and sharpener of hard surface forms. Now the “don’t recalculate option” is also worth discussing. This is a behavior that was necessary for the utility of this tool. It allows you to recalculate sharpness angles in cases where your original sharps can be moved or dissolved or basically made inaccurate due to modelling operations. So in the image below you can see how the recalculate button changes the behavior to correct erroneous sharpening and allow you to keep modelling without worrying about those things. However the default settings are for 30 degrees so I tend to adjust my sharpening when necessary however this works for most cases.

I would recommend making some shapes like mine pictured and play with the options. The differences are fairly basic but this is my utility for dealing with sharps and was created with ease of use in mind.
The last option is sub-d sharpening. This option is for subdivision modelling however thats a topic for another guide. Lets talk about csharpening.

Csharpen is a sharpener but with a bevel. This sounds like something so simple it makes the other one obsolete however it has additional features that make it special. Csharpen also can collapse certain modifiers as well as recalculate sharps with that post collapse behavior. This is where things get interesting. Csharpen also has many different options as well. Lets take a look at them.
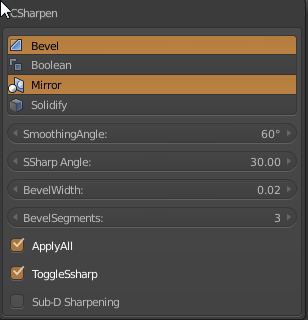
Smoothing angle pertains to the Auto Smooth angle.
Ssharp angle refers to the angle in which to calculate sharpening. Just like ssharpen’s. As you can see this is set to 30 however in some cases to get it to play nice with modelling bevels I may set it to 60.
Bevel Width is for the width of the bevel that is applied however I set this with the B-Width option instead since its more interactive.
Bevel Segments was added to allow you to choose segments for the bevel modifer.
Apply All is an overide for applying modifiers. Unchecking it will make no modifiers get applied however this option may get removed in a future version since its older and not needed.
Toggle Ssharp will make it no longer do ssharp on the object after application of modifiers however this option is best left at default.
Sub-d Sharpening is also here to allow for subdivision modelling with bevels.
The options at the top are modifiers that it will not collapse when using Csharpen. Bevel is set by default and mirror was requested heavily by moth3r. So these modifiers should never be collapsed or else you may have some issues. You can hold shift and select other ones however these two modifiers are the two main ones I prefer to keep not applied. Normally there is no reason to change or tweak these options and may result in headaches if changed however some cases require these options exist.
I must admit that I generally use Csharpen to apply booltools and bevel the new geometry so that I can continue working without delay. The options here are useful if needed but really don’t have to be tweaked 90% of the time.
Now that you understand the sharpeners lets discuss the menus.

The general menu will look something like this. However your version will have cooler icons. The two options at the top are worth discussing. They are what I like to call “smart options”. The goal of them are to guide you while working and to provide the most relevant option for what you are doing. Some options require conditions to be met in order to appear and aren’t shown because they wouldn’t be useful without a certain type of mesh.
So with a cube selected the first option is Csharpen. That’s probably how I’d start out. But once its been placed on an object it will not show anymore unless you have a boolean modifier on the object. Then the most suitable option is to apply the boolean and calculate the sharps. Hence ssharpen. Otherwise on a csharpened object the option of ssharpen will show since more than likely you have no modifiers to apply and just need to either update your sharpenings or recalculate them .
Like I said smart menus. I think they’re even smarter than me!
T-thick is an option for adding thickness to a mesh. Its a modal operator so as you move the mouse you increase the thickness.
 You can see after using T-thick. I used csharpen to apply the solidify and then the option changed to B-width. This allowed me to fine tune the bevel to a desired result. T-thick is primarily useful for making cutlines from booltools which I will show more of further down. But these options are the two main ones that are needed however if you need a specific operator you can get it from the operators menu however T-thick and B-Width are only interchangeable since it makes life easier.

So lets discuss another addition that I am proud of and that is the Rebool. Rebool will only show up if the mesh has a pending boolean modifier. This option is quite handy for making quick separations and cutlines between pieces at the same time. Basically it duplicates the object and csharpens them both with default settings. From there I use bwidth to adjust it and from there I can proceed. You can also see in the image that when adjusting bwidth to an out of bounds range can result in mesh catastrophe so keep that in mind when using it.
You also have the operators option panel in case you want to specifically perform a particular operator or use c-step which we will discuss later.

In the event you want to remove sharpening there is an option for it under the operators submenu. This is useful if you want to revert a mesh to its neutral state or remove the sharpening. There is also an F6 Panel that allows you a chance to choose what parts in particular you want to remove but usually you don’t have to tweak it unless you have a particular preference.
Under Operations there are also additional options that will show if for example more than 2 or more meshes are selected.
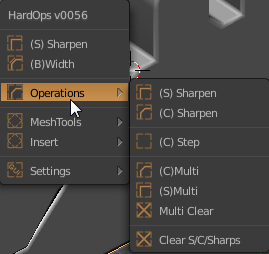 Notice how when both meshes are selected there is (C) Multi , (S) Multi, and Multi Clear present in the menu. This is because these options do as follows.
(C)Multi – csharpens with default settings all selected meshes,
(S)Multi – ssharpens all selected meshes,
Multi Clear – clears out the sharpening of selected meshes,
In order to keep the menu clear and concise these options only show when relevant.
With this stuff out of the way I’ll show a couple of the workflows in action with this sort of tool set before proceeding.
Also keep in mind I use mirror mirror which is another add on included with this add on and it allows me to quickly mirror things across other objects or themselves which allows me to work quickly and efficiently when symmetry is involved.

http://i.imgur.com/0zUyPYy.gifv
In this clip I just take a cube scale it out. Boolean it. Then before csharpening went into edit and softened the edges and then csharpened it. I duplicated the top piece and separated it and then used that to cut into the top of the shape. By doing this I was unable to sharpen due to the angle being higher than 30 degrees. So I marked them manually in edit mode in the Q menu. I then cut some pieces out and well? You can see it in the image above. With the tools at their default state you can work pretty fast for the blocking in of the shapes.
Lets make something else!
http://i.imgur.com/SRRGMlm.gifv
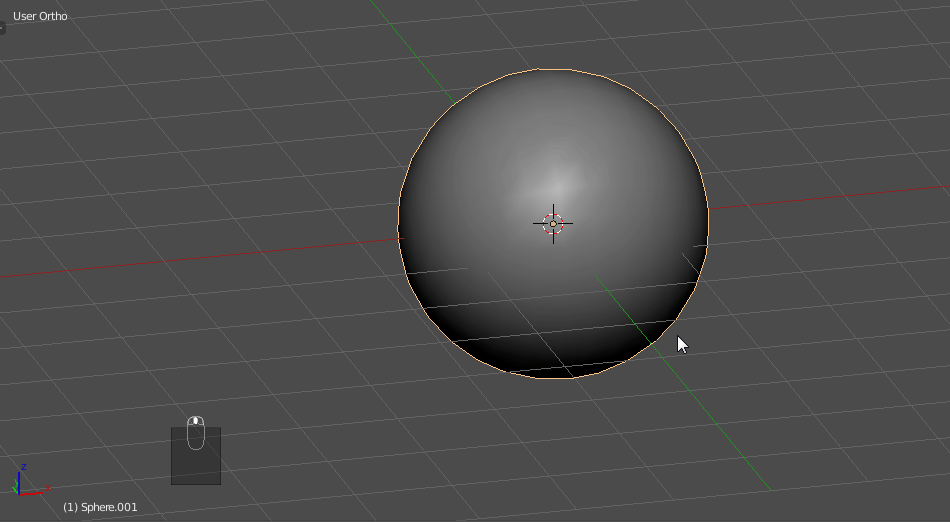
So on this example I wanted to make something on a sphere however at the end I realized I didn’t have drivers enabled with autorun in preferences so it didn’t do the rotation I wanted it to. But this should give you an idea of sorts of the basic operational use of this plugin. Now from here lets get into more depth with the options!
Its important to keep in mind that for this sphere it is an uv sphere of 32 and the cylinder is also at 32. For this in order to make sure it looks right I want to remove doubles in edit mode with w >> remove doubles. Doubles is something that will cause some disarray with a boolean based workflow however there are ways to keep it under control. And remove doubles with a slightly higher threshold is one way to keep things flowing among merging points.
I recently did a video discussing the basics of modelling or actually a recap. I go over some known and maybe lesser known functions in an attempt to keep everyone on the same page and discuss basic functions that everyone should know. I definitely recommend watching this to learn about some of the options available in Blender as well as modelling tips.
Additional Chapters
Additional Reading
