

Cstep
Cstep was a workflow developed by AR for use with Hard Ops. The idea behind it was multiple levels of bevels and also gradually decrementing bevels. So this is the creme de’ la creme of hard ops and one of my favorite features. This is not for the faint of heart because it can be incredibly fickle and destructive to the mesh.
In order to use this workflow efficiently you will need to understand guiding lines for booleans, the difference between ssharp and csharp in addition to certain behaviors that are unique but unexpected in Blender. This sounds complicated but it’s not so much when you understand how the functions work. Right now its destructive but there is a non-destructive version in the works. But in order to have full versatility, Blender needs to implement edge groups. This is something the devs may fix someday but we can cross our fingers and hope.
Sstep
Sstep is the updater function for Cstep. This is the option you will choose instead of c/s sharpen. If you use c or s sharpen on a cstepped mesh you will end up bevelling bevels which will result in undesired geometry.
Now before we begin. If you are asking why does something like this have to even exist just take a look at Vitally’s work.
http://vitalybulgarov.com/3d-kitbash/25-sci-fi-crates
Personally I am inspired by his work and definitely have learned much just from seeing his work. The levels of bevels and variable detail is something that I noticed over time and now have sought to recreate in Blender. In Vertex magazine Issue #3 (https://gumroad.com/l/Nivt#) he mentions the importance of the auto split but I know he has never seen a sharpener version of that. I would hope if he ever picked up Blender he will be right at home with a toolkit designed around his particular style.
Now lets begin!
When Cstep is clicked it applies all modifiers and applies the bevel and keeps the original bevel setup and hides the mesh in edit mode after removing bevel weight from the mesh. Since the bevels are applied that means if you ssharp this form you will cause the geometry to have issues. Since the mesh is hidden something amazing happens. When booleans are applied you get only the new boolean geometry in edit mode. This is important to the success of this workflow and thus should be understood by you the user.
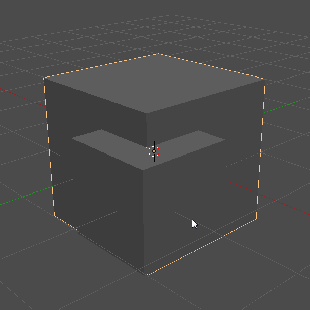
To show this behavior in action. The image here shows me hiding the mesh in edit mode and then applying the boolean. This results in only the new geometry showing. This behavior is the foundation of c/s stepping. If all the geo is shown during the sstep calculation undesired results will happen so its important to keep this in mind.
After the operators the mesh will generally be hidden allowing you to work continuously without having to worry about this specifically however certain shapes will require a particular touch to get it to behave properly as you will see.
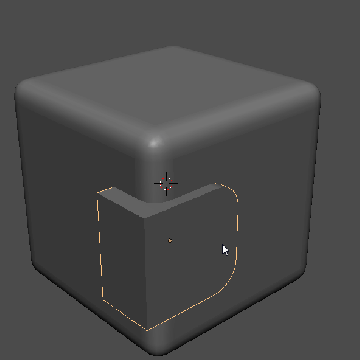
With this cube set up I just added a csharp to start and adjusted the bevel to something big with b-width. That will be the big bevel for the shape and now after cstep now the fun can begin.
No C/S sharpen on the mesh from this point on. I can’t express this enough.
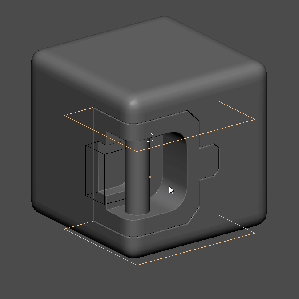
Now the fun can begin. This is when the workflow begins to get tricky but also very interesting. I am personally thrilled at the prospect of multiple bevels since it adds more depth to the model. Level 2 is also where I spend the most of my time since level 1 is for the micro detail. Lets add more details.
The tthick is especially awesome here. And is preferred to rebooling since rebool ends with csharpening which as previously mentioned is not recommended.
So let’s continue. From here is just booling and sstepping. If I use cstep its to apply the previous bevels and do something independent. I use it a little different than AR however it’s built to work the same almost.
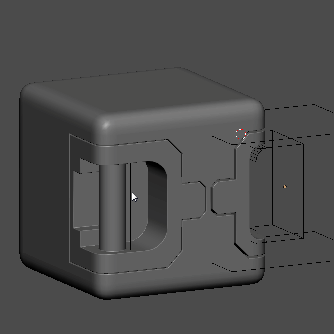
I made a few more cuts and then went into edit mode and revealed the whole mesh and separated the pieces by pressing P >> Loose Parts. Now that I have separated pieces I can tweak individually all in sstep level 2 mode. This also makes material assignment much easier as well as individual parts.

Sometimes there’s edges that are obviously not needed and should be cleaned because 1 its easy and 2 its fairly obvious which edges can go. I must also stress that edges too close together will cause bevel folding so even though you are modelling carelessly you have to keep some sort of control about since these things can stack up and become problematic. In this image you can see more correcting certain areas to keep under control. The more chaotic things get. The more control that is needed to maintain the integrity of the mesh.
A small bit of control and tweaking will go a long ways towards keeping booleans and bevels controllable. Ignoring these things will cause issues and confusion. This is why this is considered an advanced workflow and should not be approached carelessly.
Lets add more details and separations while we are on level 2.
I dissolve edges using ctrl + x. That comes in handy for removing edges that don’t flow anywhere. I also take advantage of using the knife tool (k) to cut through using (z) and the be in a straight line using (c). Then I use the bevel (ctrl + b) to bevel to space out the geo and create and edge flow where there was none.
Lets go deeper one more level. At this point errors may occur. This is due to the supporting edges I mentioned previously. When this happens the sstep will hang in edit mode. There’s no need to panic just select all. Go under select and choose select boundary loop and mark sharp with Q >> Mark SSharp. Then the bevel will be present. However to avoid this you must put a support loop before the process of sstepping in order to keep it flowing under control.

You can see I received an error here. This can happen on the lower levels. This is also why sstepping is still a workflow being refined but is so much fun to have when it works right. In the future the errors will be dealt with. But to know how to deal with it is key to proceeding and finishing up the model.
Also starting from something slightly denser might have helped but I am unfortunately a sticker for keeping things as low as possible which might also cause some issues.

So now I cstepped the dark area and booled so I can go down another level and this one luckily gave me no error. But I think at this point you guys have a good idea on how to approach it. I recommend trying the same thing on a cube and it will become clear. I hope this guide was clear and helped.
Keep in mind this workflow is experimental so it requires a bit of practice. But once you got it its the most fun you can have while wearing pants still. Now get to c/s stepping!
I also did a timelapse on the workflow of cstepping. With the information of this guide this should make some sense.
