Box Cutter Guide V1

Box Cutter is released! https://gumroad.com/l/BoxCutter#

https://gumroad.com/js/gumroad-embed.js

Legacy Hard Ops users will of course receive a discount.

Box Cutter is a brother of Hard Ops and a standalone product.

IF YOU HAVE THE RED BOX DEMO ONLY THE RED BOX IS AVAILABLE.

To start it press alt + w. To draw a sub box press ctrl + left click and drag. It requires a selection otherwise it uses the selection lasso.

BoxCutter is a secondary project focusing on cutting with a different perspective than the toolset we all know as Hard Ops. They are intended to be used together however separately they still work albeit behave differently.

Starting box cutter after enabling the add on is under the hard ops T panel.

2016-04-25_18-09-19

The t-panel is worth looking  into.

blender_2016-05-01_08-18-59

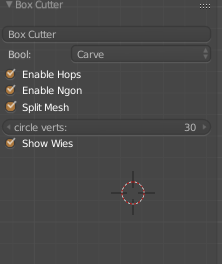
This step is important since it allows the sharpening to happen after cutting. The beveling and sharping helps in differentiating the shapes easier when they are the same color.

Also Hard Ops received a last minute update to support box cutter in the Q menu under mesh tools in object mode.

blender_2016-04-25_18-13-57

The last one isn’t necessary however it’s there for additional functionality. The hotkey at the moment is Alt + W.

In total theres 3 ways to start box cutting.

Alt  + W

T panel >> hard ops

Q >> Mesh Tools >> Box Cutter 

That is as easy as we can make it.

Now for the complicated stuff but very fun stuff.

Firstly when you are in box cutter the screen has indicators. This is important. Very very important.

blender_2016-04-25_18-21-39

The box on the right is AR’s idea of indicating Box Cutter mode. I wanted it red but haha its grey. On the left is the Cutter indicator.

This is something you want to be aware of.

D – changes mode (Box , Circle, Ngon) for now (while in box cutter state)

Esc cancels

So basically in Object mode you can use D to change cutter mode. And cancel with escape. You want to cancel when you aren’t using it since we currently are still dealing with it. You can open multiple box cutters on top of each other by accident. Which is unexpected and unwanted behavior.

So now lets get cutting!

2016-04-25_18-28-01

Holding down ctrl allows for you do cut out a shape in a box that you draw.

However this has a modifier to it as well. Holding alt while drawing makes it cut to the depth level of the 3d cursor!

2016-04-25_18-31-08

This is quite an interesting behavior when you want to control depth however we are still examining other options. But there is more to it than even that.

If nothing is selected you can draw a white box. This is just for creating a quick box.


2016-04-25_18-34-58

With nothing selected it draws white boxes and with a selection it draws a sub box. If you hold ctrl + shift when drawing with nothing selected you will draw a box from the 3d cursor’s position.

2016-04-25_18-37-00

This behavior is intended for speed so pressing things without being aware can make for a crazy experience. Kinda like opening Zbrush for the first time.

While the sub and additive brushes seem awesome the real favorite for me is the slicer. This brush will slice out the mesh into a new section similar to the rebool but with a whole different perspective.

2016-04-25_18-40-44

Holding ctrl + shift will bring up the slice/rebool box. The same modifier of shifting to alt during still applies for cutting with depth. The way Box Cutter is setup is that you can make quick cuts in quick succession then go in for the kill with finer detail and Hard Ops based workflow.

Admittedly this will take some practice but hey this is version 1. As with Hard Ops we plan to make large improvements over time and refine it the level of what we consider “finished”.

When it comes to the art of cutting in Blender it goes without saying that guidance edges are as important as ever when it comes to performing booleans successfully. So additionally the option to fast bisect has been mapped to ctrl + D. Pressing it will take you into an edit mode setup where you can quickly click drag and bisect.

2016-04-25_18-48-56

For this basic example it is overkill but in the thick of things this is a very useful tool to ensure your bevels and booleans are working together. Otherwise this method of creation can become a game of luck when eventually you hotline and have to undo.

Additional shapes exist with the same behaviors like ngons and circles however they are more experimental at this time.

2016-04-25_18-54-27

Ngons exist too but they’re my least favorite at this time. And also are the most experimental.

2016-04-25_19-06-39

You have to click to start which provides no feedback until the 3rd point or so. This behavior I feel will be the hardest to get used to however it is available for those who want to use ngon shapes.

We still have much more planned on expansions for this in the future so stay tuned for more information. This wiki is a bit short at this time however a more detailed one will follow.

2016-04-25_19-04-29


Notes. Esc ends box cutter. End box cutter before closing your scene or opening files. The red border is to let you be aware of box cutter mode. So you don’t accidentally press alt + W twice.

Hard Ops 0079 Update


It is with great pleasure that I announce the release of Hard Ops 0079. The intermediate release on the road to Hard Ops 8 and the last of the 007 series.

https://gumroad.com/l/hardops/

It was intended to be a small bugfix but has become a very nice release.

I’ll start off talking about the most exciting part added.

UV Preview!

I even made a whole video about it.

2016-04-17_09-33-14This was a feature I had dreamed about for the longest and it was made possible via your friendly neighborhood Python.

https://www.youtube.com/channel/UC5ABAuGEvBMmau-1xJsNw6w

Plus he recently updated Animation Nodes!

In case you weren’t familiar, there was a UV unwrapping script made by PLyczkowski that was being used in Hard Ops.

https://twitter.com/PLyczkowski

Previously there was Punwrap and Cunwrap. However that might have been overkill and not clear so they have been combined into a new unwrapper called the X-Unwrap.

2016-04-17_09-47-01

It does the functions on both of them however its just a quick and dirty unwrapper for hard surface meshes. We have also made some additional improvements for ngons and cstepped meshes. Which is where this thing really shines. Sometimes you just want to unwrap and move on. Especially with pieces that aren’t the forefront. It really exists just to make it easier for people using texturing suites like Quixel or Allegorithmic.

In other news there is also a Pro mode for Hard Ops now. It can be enabled in preferences and is disabled by default. This isn’t a pro mode as much as it is a way to keep Hard Ops under control.

I personally tend to take clicks, double clicks and repeated clicks into consideration. So some of the parameters exposed are my way of testing alternative ways of doing things however they may not be best for new users and users not familiar with my way of working. To new users coming to Hard Ops it might be overwhelming and confusing especially since most of the things done are under the hood.

2016-04-17_09-54-42
Hard Ops Without Pro

Hard Ops without pro options is pretty straighforward. It is as direct as I can simplify the menus at this time however I am looking into ways to having the operators act differently as well.

2016-04-17_09-58-00
Hard Ops Pro mode with and without

So you can see all the additional options that are enabled. These aren’t used by most people however now it can be a choice and we can make a cleaner Hard Ops. I might begin polling to see how people are handling functions and which ones they like and maybe a vote for revamps or something.

Speaking of revamps. AR in the shadows always improving things, has improved the Tthick to an amazing level. Previously the Tthick was adding a solidify however I wanted to use this as a tool for robot workflows by being able to shift the thickness offset and rim primarily to get a very specific and interactive solidify.

During Tthick you can press 1,2,3 to toggle -1,0,1 offsets on the solidify. This was a very exciting feature and I did a whole series of robots as a result.

Image series: H6

2016-04-17_10-30-34
Super Saiyan Bankai Tthick

So did everyone like the modifier helper? I hope so. It’s one of my favorite additions to Hard Ops. Thanks to MKB, AR, and everyone else it has been expanded! Now in additions to modifiers you can also adjust materials on a basic level. It’s still a work in progress but I didn’t want to hold up the release on a material panel.

2016-04-17_10-35-33
Material Helper V1

The material helper is part of my lifelong dream to use blender with no UI until I need it. The power of python astounds me repeatedly when I keep telling myself I’ve seen it all. Blender and its expand ability and customization is top notch compared to other software and I hope the spirit of 2.8 is still that same power in the hands of the users. Everyone should code something in some way. It’s the best way to understand this dragon called Blender.

Radial array is also added in the preliminary stages. I want to have it be less destructive on the meshes being rotated but it’s a nice start. Jyri wrote it a version ago and I forgot to enable it! It might be added the the Q Array as an additional functionality but that’s for the future. Atwist 360 is also still available. However this might replace it once it comes to fruition.

http://blenderartists.org/forum/showthread.php?390354-Blender-Astromonkey

2016-04-17_10-19-21
Radial Array


Some of the additional options are status override and status reset. These two are under pro options but are a fun time when you get to using them.

The 3 options at the top of the Q menu change according to mesh context. There is also a panel to change the context of the mesh manually basically allowing you to override your workflow with Hard Ops. This sounds boring in context but in usage is quite exciting since you can force the mesh into different workflows.

2016-04-17_10-08-07

So being able to work like this opens up new possibilities for me however when going from cstep to csharp you will want to use a larger angle than 30 degrees for recalculating bevels in order to prevent ruining your mesh.

blender-app_2016-04-17_10-22-29
Meshtools Extended

Inside of meshtools is the status override we discussed previously. However there is also the status reset. This is the most used part of status overide. Just reset it back to undefined. By doing this I can start over at any point on the mesh and use the basic options to work.

If you need help spacebar >> learning >>

2016-04-17_10-41-38

The tools are just as important as being able to teach people how to use it effectively. I read a review where they said there wasn’t enough training. So I took it to heart and tried to fix it for new users or those who could use a helping hand. Same goes with criticism and comments. I take it all into consideration. Negative or not and try to find what information can be used to improve the user experience. People get passionate about their buttons… I understand.

There’s many more improvements and resolutions for previous glitches not to mention new ones added. I’m sure I am also missing more new features but I’ll leave that for the users to discover.

So I hope everyone enjoys this latest update from TeamC and thank everyone for reading this and your support. It keeps this product alive.

Also if youre making awesome stuff with Hard Ops let me know! I’m always looking for more operatives to add to the gallery!