Fidget is pretty detached from HOPS and BC and is more of an experiment. However Hard Ops has an alt + V menu for viewport and Fidget pops up there was well if present.
FIDGET is a separate product that can be downloaded and installed similar to our other tools.
Fidget has many shift + w options in the node editor for mapping HOPS commands so give it a try!
Fidget like boxcutter can easily be closed with esc. Fidget will get documentations and its own blog post at a later time.
Edit Mode Booleans
When it comes to integration with new features I usually wait and experiment before integrating it in order to make sure it doesn’t disappear or change dramatically.
In edit mode you can select an object and press ctrl + alt + numpad minus or plus to union or subtract geometry.
This is less dynamic than object mode booleans but it offers exciting new possibilities as well.
Red / Green Boolean System
Previously Hard Ops had an immense amount of focus on setting up booleans then applying them. Over the course of recent work it has become needed to keep them dynamic for a little longer than previously.
To show in action. This is the classic behavior.
In the Q menu pending boolshapes will have an option for green / red.
Green will allow it to go on and be applied.
Red will stop it from being applied and allow for more adjustment.
Notice I changed it to red to stop it and keep it dynamic and live and back to green to then apply it and continue.
Sculpt Mode: Brush Menu
If you press Q during sculpt there are now options based on sculpting. This will be expanded in the documentation but is worth a shot!
Mirror Rewrite
Sounds boring. Why is it last? Because it’s the best.
Previously Hard Ops used a combination of symmetry systems brought together but still was complicated.
Symmetrize which we modified to our needs.
Mirror Mirror a previous tool I was involved with. Now built in.
Automirror by Lampagne which was great however unification was the ideal method. So this tool is no longer needed.
The modifier helper is brought up with ctrl + ~.
The modifer helper lists the modifiers present on the selected model.
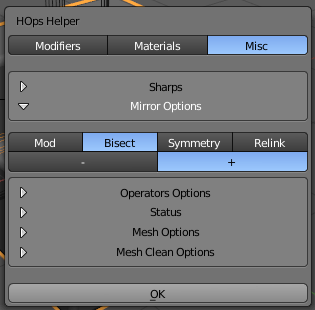
Materials and misc are the other 2 tabs. Lets look at the misc.
Expanding mirror options we can see there are now all options built into Hard Ops. And the best part is the fact that its listed in the helper means you can configure the behavior before the tool is used.
Mod – adds a mirror modier
Bisect – splits the mesh then adds the mirror modifier
Symmetry – similar to symmetrize and is a form of one and done destructive mirroring
Relink – relink will create a group instance mirrored on the negative axis of an object. This one is a form of mirroring which uses no modifier and is a group instance.
The mirroring rewrite was the biggest part of this latest update. I hope all the users come to enjoy it and without issue.
I must personally thank AR and Proxe among the many others who email me for their assistance. Its amazing this tool is still going and I hope to unveil many more ideas before we tie the bow on it!
I should mention here booltool is no longer needed / required for Hard Ops. We support it however certain features require it not be enabled.
After the release of Hard Ops 0087 we immediately got to work on the next version working to unify things on a level that makes the workflow easier to explain and use. I plan to release videos for this version when possible to help explain but I will attempt to in this update log.
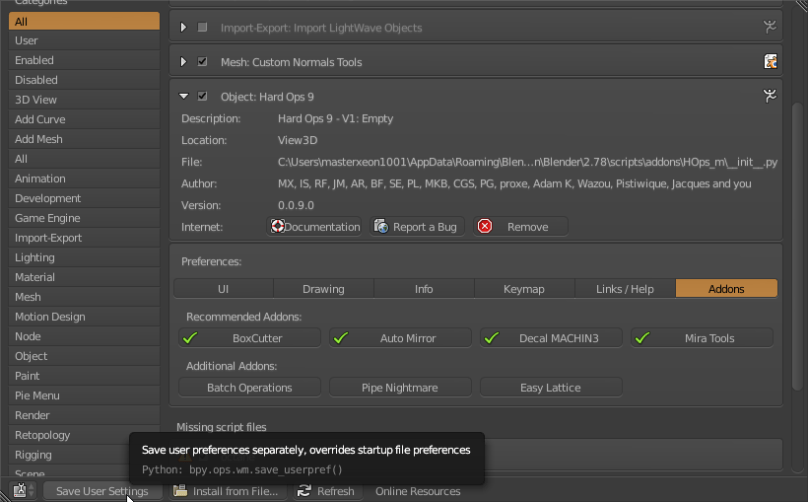
Let’s begin with the Hard Ops preferences in the add-ons panel.
Add On Prefs –
The hotkeys of Hard Ops are now listed in the preferences. It is recommended to uncheck them to disable them. (Do not click the Xs). This shouldn’t be needing any adjustments and is experimental.
The addons panel and which ones are recommended is also updated .The main change is the decalMachine. Clicking the Hard Ops link will get you a discount on the product. To find out more about decalMachine check this link to find out more.
There is also a Modal Scale for making the modals work at larger scales but we will go over this in its 2nd location. The misc menu of the Hops Helper (ctrl + `)
Ok so with the addon prefs aside lets get to the T panel. The Hard Ops learning tab is there for users to find out more on how to use Hard Ops and get help.
I hope the learning tab can be useful in helping more people get started with Hard Ops.
The Q menu has went through some changes. As you can see all options are listed however the context. For example merge and cslash (formerly rebool / cslice). These options are particular and will do nothing if the context is not correct.
But another thing to note is Cstep / Sstep / CBake are gone. The cstep / sstep workflow is now simplified into the Csharpen / Ssharpen / Step workflow.
Basically Step will bake the bevels and set up the bevel modifier in addition to putting the mesh in Cstep mode.
To demonstrate this in action. This is the normal boolean / Csharpen behavior. Just perform a boolean action and press Q and Csharpen. Also note the boolean object became sstatus: boolshape. This give the boolean object a special q menu. I bevelled using a neutral bevel instead of csharpen bevel due to the cutting of weights into geo is not recommended.
To take this a step further lets Step and then do a boolean and Csharpen again. Then use Step to bake the previous bevels and then adjust the bwidth of the new bevels. This is not much of a departure from the previous workflow except now ssharpen and csharpen work with cstep meshes. So the other operators were not needed. This should make the learning process easier for beginners especially.
CSharpen and Ssharpen now work on multiple meshes. As does Bwidth.
This isn’t even the best part.
This is.
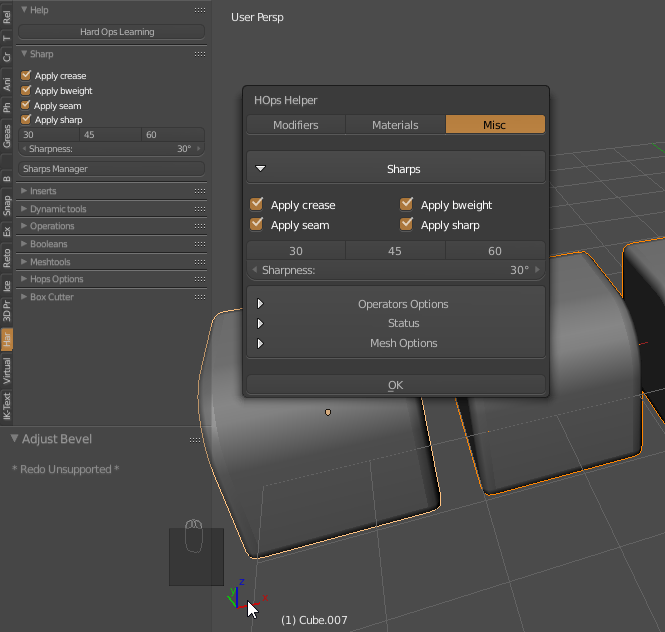
In the T panel and (ctrl + ~) Modifier Helper is an Sharp tab. This allows you to set the sharpeners S/C and step’s angle parameter. This can be useful in cases where you need a higher number before doing an operation. This makes the Hard Ops workflow much faster and easier to work with. Here is an example of how it can be used.
The easiest way to explain what is going on is.
Bwidth to show the bevel is still live
Step to bake the bevels
Changed Sstatus to Csharp for emphasis
Ssharp with 30 degrees (this bevelled the bevel with is undesired)
Changed angle using Mod Helper Sharp area to raise to 45.
Bevel is no longer effecting undesired edges because the limit is 45 and not 30
Bwidth has also seen some enhancements. In addition.
You can use Bwidth to turn off bevel modifiers by pressing V. In fact pressing H will show help. This is for all modal operators.
There are even more enhancements beyond this that I am sure am missing. On a technical level they perform even better with heavy scenes than before however with so many changes I expect glitches.
Reset Axis Operator –
We added an option to reset an object on an axis.
It comes in handy for orienting things on the x axis which is it’s main purpose.
Sharp Manager –
This was also an important feature that I am quite pleased with.
In short. This will convert sharps to seam / bevel mark / sharp / subdivision crease. This can be useful when using subdivision to block in a model and then applied and used with beveling which I do alot.
This panel looks complex but really the top is all that matters.
In my typical use cases I am holding shift and clicking sharp on the left side and selecting all the options on the right side.
When using subdivision block in and applying it via alt + c or clicking on the apply button of the modifier all the ssharp edges get converted to sharp edges so the converter just converts them back.
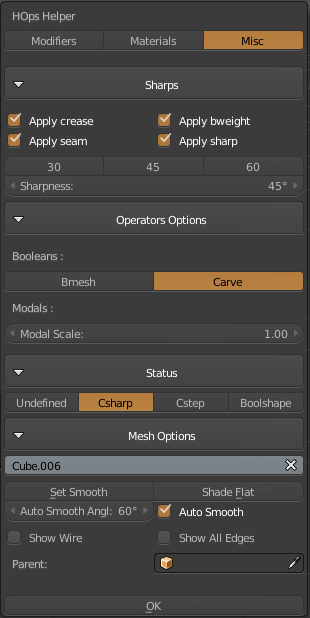
Modifier Helper –
The misc tab has been populated with options. This will be useful for using this in full screen mode and accessing quick options. In this screen all options are expanded for effect. I’ll go over what they mean.
Sharps (covered previously on page)
Operator Options
Bmesh / Carve (this will change the behavior of booleans in Hard Ops)
Bmesh is nicer but less stable / Carve is completely stable but gives undesired edges alot of the time.
Modal Scale – Sets the modals to a multiplier for working with meshes larger than usual or smaller. This is ideal for scale modelling or accuracy.
Status – sets the sstatus of the mesh. Replaces sstatus override.
Mesh Options (options for dealing with a mesh and smoothing)
Set smooth / flat shading / autosmooth angle and enable autosmooth.
Show wire / all edges. For times when wire must be enabled or disabled
Parent – just a test
There is still more we plan to do with the helper. It has opened the door for a whole world of functionalities. The modifier helper concludes a 3d long dream of being able to mess with modifiers without the panel.
The material helper is also working better than before.
Cutting Material is where you can specify a material to cut into another object.
This was covered in the last version where it made its debut.
Bevel Multiplier –
Sometimes when I finish a model I want to divide / multiply all the bevels present. This option fulfills that need. All selected objects will have their bevel width multiplied by two. Or divided with the checkbox which can also add some realism depending on context.
Sstatus Logo –
At the top of the screen it used to tell the sstatus of the object however this proved to be confusing to this has been replaced with a discreet logo for notifications. I want to expand its uses however this is the initial implementaion.
Someday it will do something in addition to be colored for notifications but that is for down the road. It is barely visible when the mesh is not in a sstate from Hard Ops. This should provide some assistance to following future tuts and understanding the upcoming “modes”.
Renderset 1 –
Renderset 1 is my default render setup I use for tutorials and basic rendering. It has been expanded to use filmic.
This is just the way I render and can help with setting up renders. GPU recommended.
Edit Mode Enhancements –
MDisp – Mesh Display –
This will hide ssharps from showing in edit mode. This was requested a while back.
Only a visibility change. No sharps are affected.
Edit Sharp Global –
If you need to adjust what edit sharp does the T panel allows this. You can also set it in the (ctrl + `) modifier helper.
Other than that there were no other notable edit mode changes at this time. Things are planned however but planning is required.
With that I conclude this update log and can’t wait to show whats next for Hard Ops. This has been a steady refinement over time and not a day goes by where we aren’t discussing what next to do with Hard Ops. I am honored to have received so much support over the course of the project. The community keeps this tool alive.
Also if you are curious of the official changes internally there is release_log.md file you can open in any text editor or even blender’s text editor.
Legacy Hard Ops users will of course receive a discount.
Box Cutter is a brother of Hard Ops and a standalone product.
IF YOU HAVE THE RED BOX DEMO ONLY THE RED BOX IS AVAILABLE.
To start it press alt + w. To draw a sub box press ctrl + left click and drag. It requires a selection otherwise it uses the selection lasso.
BoxCutter is a secondary project focusing on cutting with a different perspective than the toolset we all know as Hard Ops. They are intended to be used together however separately they still work albeit behave differently.
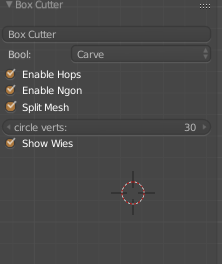
Starting box cutter after enabling the add on is under the hard ops T panel.
The t-panel is worth looking into.
This step is important since it allows the sharpening to happen after cutting. The beveling and sharping helps in differentiating the shapes easier when they are the same color.
Also Hard Ops received a last minute update to support box cutter in the Q menu under mesh tools in object mode.
The last one isn’t necessary however it’s there for additional functionality. The hotkey at the moment is Alt + W.
In total theres 3 ways to start box cutting.
Alt + W
T panel >> hard ops
Q >> Mesh Tools >> Box Cutter
That is as easy as we can make it.
Now for the complicated stuff but very fun stuff.
Firstly when you are in box cutter the screen has indicators. This is important. Very very important.
The box on the right is AR’s idea of indicating Box Cutter mode. I wanted it red but haha its grey. On the left is the Cutter indicator.
This is something you want to be aware of.
D – changes mode (Box , Circle, Ngon) for now (while in box cutter state)
Esc cancels
So basically in Object mode you can use D to change cutter mode. And cancel with escape. You want to cancel when you aren’t using it since we currently are still dealing with it. You can open multiple box cutters on top of each other by accident. Which is unexpected and unwanted behavior.
So now lets get cutting!
Holding down ctrl allows for you do cut out a shape in a box that you draw.
However this has a modifier to it as well. Holding alt while drawing makes it cut to the depth level of the 3d cursor!
This is quite an interesting behavior when you want to control depth however we are still examining other options. But there is more to it than even that.
If nothing is selected you can draw a white box. This is just for creating a quick box.
With nothing selected it draws white boxes and with a selection it draws a sub box. If you hold ctrl + shift when drawing with nothing selected you will draw a box from the 3d cursor’s position.
This behavior is intended for speed so pressing things without being aware can make for a crazy experience. Kinda like opening Zbrush for the first time.
While the sub and additive brushes seem awesome the real favorite for me is the slicer. This brush will slice out the mesh into a new section similar to the rebool but with a whole different perspective.
Holding ctrl + shift will bring up the slice/rebool box. The same modifier of shifting to alt during still applies for cutting with depth. The way Box Cutter is setup is that you can make quick cuts in quick succession then go in for the kill with finer detail and Hard Ops based workflow.
Admittedly this will take some practice but hey this is version 1. As with Hard Ops we plan to make large improvements over time and refine it the level of what we consider “finished”.
When it comes to the art of cutting in Blender it goes without saying that guidance edges are as important as ever when it comes to performing booleans successfully. So additionally the option to fast bisect has been mapped to ctrl + D. Pressing it will take you into an edit mode setup where you can quickly click drag and bisect.
For this basic example it is overkill but in the thick of things this is a very useful tool to ensure your bevels and booleans are working together. Otherwise this method of creation can become a game of luck when eventually you hotline and have to undo.
Additional shapes exist with the same behaviors like ngons and circles however they are more experimental at this time.
Ngons exist too but they’re my least favorite at this time. And also are the most experimental.
You have to click to start which provides no feedback until the 3rd point or so. This behavior I feel will be the hardest to get used to however it is available for those who want to use ngon shapes.
We still have much more planned on expansions for this in the future so stay tuned for more information. This wiki is a bit short at this time however a more detailed one will follow.
Notes. Esc ends box cutter. End box cutter before closing your scene or opening files. The red border is to let you be aware of box cutter mode. So you don’t accidentally press alt + W twice.
Hard Ops has experienced many changes underneath while attempting to retain the same philosophies that have been used over the course of it’s development.
The menus have been revamped with many new options and new icons thanks to Adam Krol or AK.
So the menus have remained the same on the main level for the most part however the options inside are where the real changes can be found.
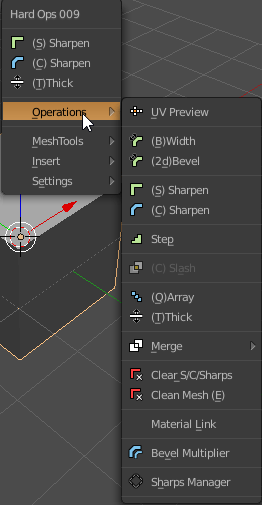
Its important to remember in Hard Ops.
The first 3 options are the recommended options. You should use those however if not you also have operations where you can use options that aren’t in the top 3.
Meshtools, Inserts, and Settings are used less often so they are the bottom. Usually the first 3 do the recommended job in most cases so it also can be an indication of the mesh status. But that is a bit of work. How about we do you one better?
Now the 3d view has an indicator in the corner for showing the status of the hard surface mesh.
In Hard Ops as far as the functions are concerned there are 3 mesh types.
-meshes that hard ops hasn’t touched intimately. Undefined meshes.
-meshes that have been Csharpened (thus beveled)
-meshes that have been Cstepped (bevels are baked but re-added)
Understanding these 3 mesh types will ensure your success with Hard Ops. One day the process will be made easier but it’s quite easier than it was in previous versions so progress is made with every release.
Also new to Hard Ops 007 is the on screen hud. This was added by the animation nodes master Jacques himself! https://www.youtube.com/channel/UC5ABAuGEvBMmau-1xJsNw6w There are quite a few superstars involved in this version and code wise its more solid than it has ever been. But of course expect bugs haha.
The hud was something I wanted for a while and based off of user feedback it seemed obvious visual feedback would make things so clear.
B-Width now has an onscreen indicator thanks to Jyri http://blenderartists.org/forum/showthread.php?390354-Blender-Astromonkey in fact his postings were the reason I felt everything needed on screen indicators. He has been an important part of Hard Ops as well and was a major factor in this release.
Q-Array was added as the result of Jyri and further perfected by Jacque who I gave the code name Python because he’s a fierce coder. AR added the ability to set up 2 arrays at once on it then we realized we were making features we’d never use.
T-Thick is now T-thick2 and has an on screen hud now as well. All the visual feedback is making my goals of fullscreen working closer to a reality.
This is just the beginning. The features list was beginning to get so long that it was hard to keep up with all the changes. So lets continue with the features!
It’s not uncommon that I request a feature that is met with “that can’t be done” or “python doesn’t go that way”. However the modifier helper is one such thing. This was first implemented by my good friend, product visualizer and fellow coder Claas Kuhn https://www.youtube.com/user/cekuhnen/videos
By pressing Ctrl + (`) you can bring it up in the 3d view and edit modifiers on the fly. It was further perfected by the Python to fix glitches and now it works perfectly.
The goal is to someday open blender and press alt + F11 for full screen mode and then alt + F10 for full screen 3dview. With this addition, the goal is even closer and I plan to expand on it even more to make the menu more useful. Many who are using the preview found this little Easter egg already by it is one of my favorite.
You may have also noticed the preferences section with recommended add-ons. I have always recommended particular add-ons for the utility and functions that they offer that expands on the original behaviors.
If you are missing an add on it will simply show you where to get it. No errors. However some options may be missing that are special experiments with functions for Hard Ops to play off of. I am a big fan of the Mira Tool for example so in edit mode there’s a quick option in the Q for using the curve stretch when present. However this is just an extension for convenience and experimentation so it’s all unsupported. If it works for you just have fun and enjoy the ride.
Auto-Mirror is another plug I am quite a large fan of. As a left handed artist. I made a small adjustment to make it accommodate. When present in Blender with Hard Ops additional options are unlocked.
Symmetrize UpgradeAuto Mirror Menus
There is both a Mirror Helper popup window and an experimental option panel as well. Both of them function primarily the same however the open menu is a little quicker. It’s just something worth experimenting with as well. I enjoy the bisect and mirror behavior of the auto mirror so it’s utility in hard surface application was fairly self obvious. I do love the way it behaves.
That doesn’t mean the regular symmetrize hasn’t been left out. It has been updated with an on screen display and is now interconnected and rewritten from scratch. It also supports Cstep and Cshapen behavior so it can symmetrize and setup the mesh for cstep without messing up the bevels that were previously baked. This was something that annoyed me personally so I was glad to see it fixed.
There have been many overall fixes to the behavior and the psychology that was brought about with the introduction of the status mesh system.
What I mean by this is….
NoClear Sharps HUD
When working in Hard Ops I assume by now you understand sharpening and stepping. You sharpen the mesh to perfect and set up the surfaces but once it’s detailing time you cstep it. You don’t go back to csharpen and ssharpnen then. Because the default settings will bevel your bevels. Which will never look good and can cause artifacting.
So now if the mesh is in cstep you can no longer use the sharpeners which is much better for the geometry and the psychology of the user. This update was added as the result of me watching one particular user. Who will remain nameless.
If you wanted to really reset the mesh to use the sharpeners you could always clear ssharps under operations. Which resets the mesh status.
In fact. Clear Ssharps has a hud now too. Everyone gets a hud this release. Sometimes I look over the plugin and ask. Who else needs a hud?
The addition of subsets was in the 0065 release.
These inserts are different than the regular inserts in both behavior and usage. Subsets are basically inserts that are built to be inserted within a surface and then csharpened or sstepped to integrate it into the surface. Personally I like to use cstep for this since it allows for individual bevel configuration in between bakes. However this is a finalization workflow. There is no going back. At least without a little pain.
Subsets are made up out of 3 meshes. Subsets also insert always to the 0,0,0 of the scene and not on faces and at the 3d cursor like regular inserts.
AP which is what you use to set it on the surface and the merge. It is an X-ray mesh.
BB which is the mesh that is being cut out to make room for the…
OB which is the mesh that is being inserted into the surface.
This is a system I have been working on so I can expand its usage even further. However in its current state when you insert a subset. It selects the AP automatically so you have to do nothing.
Except hold ctrl and snap it to the surface. After pressing G to grab.
Then shift select the underlying surface and choose merge to finish the job.
The subsets are not built to be customized but are just me experimenting with different mesh systems so for those who long to add their own assets…
Wazou has played a major role in the initial insert system implementation however the idea of user added inserts have been taken to another level with Asset Manager or AM for short.
Users of AM will be pleasanly surprised to see that Hard Ops utilizes the AM plugin in its menus when present. You also have an option to turn if off if you wish to keep them separate. The support of AM was an important thing to me personally and even if it’s not present you still have inserts to play with. Consider our insert system a demo of what AM is capable of.
AM would be it’s own post and they already have documentations so check it out.
Full AM Support
While we’re still discussing inserts. The classic insert system has been upgraded immensely and is using an entirely different system. When you insert meshes to faces they are already sharpened and have material groups for quick mat layouts. They also insert in a modal scale mode so you can perfect the size before applying.
The internal process of inserts was rethought and re-coded with an entirely different approach than before. Thanks to the python the inserts are more stable and better than ever. Not to mention the on screen messages and the auto grouping upon insert.
Revamped Inserts
The insert system of Hard Ops is quite different than previous versions and also has a tear away version so you can have it on the screen for a moment. And thats not all!
There’s now an asset scroller for cycling through them without the big window. Just in case you’d like to try it.
Asset Scroller
“The Python” implemented quite a few features this release and also rewrote many of the sharpeners to increase their stability and to get them to interconnect. So Csharpen calls on Ssharpen while Csharpening.
Rebool also has support for Cstep/Sstep mode where it will keep the mesh status.
Theres many small glitches that have been fixed for example the menu not showing when nothing was selected. Or the menu not showing when there were no objects. “The Python” fixed that.
The settings area has also had some additional parameters added for convenience. For example there is an option to rename an object. Or make the name display in 3d view.
Settings Upgrade
These were more options that were an inconvenience to locate manually. However if you think that’s it, we’re only getting started.
In addition to renderSet improvements I also added a parameter for the cycles samples for times when I just want to boost it a little. If you select a camera the options are a little different. This was also something that I felt needed to be done since sometimes the N panel can be a visual mess to sort and find things in.
Under Operations there is a panel you can use to set the bevel segments on an object to something else. It has been surpassed in usage by B-Width but is still available.
Some of these options may seem excessive however they are just ideas to see how well they work. I might do a poll on how some of the features are working and see about removing some but that’s for later. I like the usage at this time.
The goal is to have some smart context menus that come up with Q for particular options with parameters that are useful to the users.
Camera Q Options
The next topic is sure to cause some disputes.
The Pie Menus have been upgraded. As have the Menus. As have the Panels. In fact completely rewritten.
Since version 006 the pies have fallen into disrepair and behind on the latest tool enhancements. So we took the opportunity to rewrite their logic and make them behave like the menus themselves.
The menus are 3 options / Operations / More Options
So that same thought process was taken to the pie menus.
While the arrangement may seem odd this is AR’s take on it for the 007 version. It contains the same psychology of the menu with the arrangement being optimal for preventing the 3 main options from being the spotlight. There are also boolean options when multiple meshes are selected thus reducing the need for the 2nd pie menu. Also inserts show when nothing is selected.
Pie Menus In Action
The pie menus had been ignored for a bit previous to this so it’s good to have them usable again. There’s even more feature and glitches to go over however this should suffice for an introduction to Hard Ops 007.
I hope everyone has been enjoying it as much as I have and I thank everyone for their support. Without the immense team you see in the credits and author list this plugin would never be what it is now. I hope that the future holds many more enhancements and improvements.
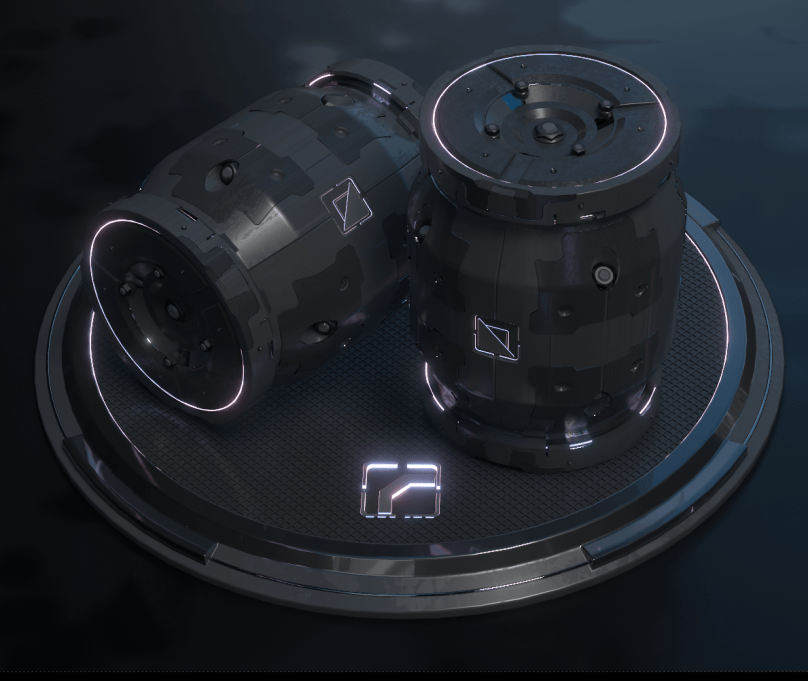
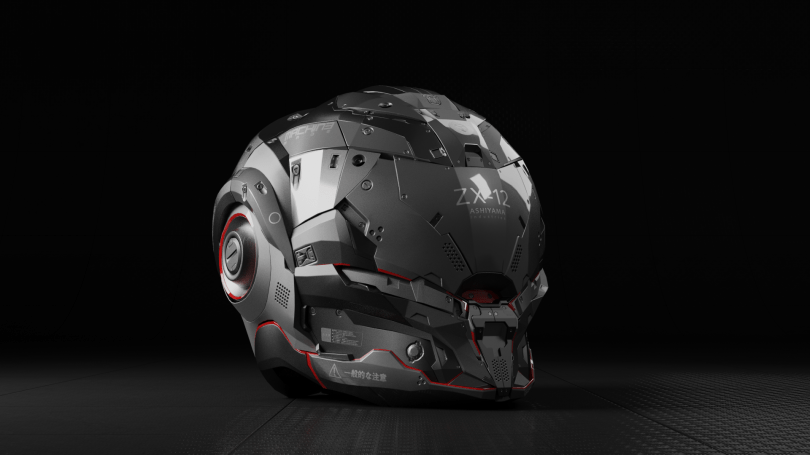
Also demos galore!
So cubes are how I have come used to testing Hard Ops quickly. Over the course of this adventure I am proud to see these cubes looking more and more serious. I implore everyone to try on one before diving in just to make sure the tools are working as predicted. Its a hoot.


 Gumroad customers… the file is in the gumroad. At the top. The latest files are always at the top.